Installation and Activation
System Requirements
| Minimum (to run) | Recommended (to perform) |
|
|---|---|---|
| Operating System (32 / 64 bit) | Windows 10 and above MacOS 11 - 12 | Windows 10 and above MacOS 11 - 12 |
| Processor | FHD / 1080p: 1GHz Single Core UHD / 4K: 1.6Ghz Dual Core | 2GHz Dual Core |
| RAM | FHD / 1080p: 2GB UHD / 4K: 4GB | 8GB |
| Graphics | FHD / 1080p or less: Integrated UHD / 4K: Intel HD520 or equivalent | Dedicated |
Please Note: Older versions of Microsoft Windows and macOS may work, but are not officially supported. Certain multitouch features such as GameZones are only available on Microsoft Windows.
Licensing and Activation
After installing the software and opening it, an activation window will appear.
Type the 16 character product key into the box and click OK.

If there is an active internet connection, the software will automatically activate. If the computer does not have an internet connection or is behind a proxy server, automatic activation may fail. In this case, click Next to either:
Activate via website
Choose this option to activate on another computer or device with internet connection. This option can also be used if automatic activation failed due to being behind a proxy server.
Activate via phone
Call our UK office and quote the serial number over the phone. We’ll supply the activation code. We’re open from 9am to 5pm Monday to Friday.
Activate via email
Creates an email with the default mail client to activations@qwizdomoktopus.com.
A response from our UK support team with an activation code is normally sent within one working day.
Getting Started
Getting Started: Video Overview
Please note: Premium Features and Lessons may not be available depending on your geographical location or your OKTOPUS software provider.
The Sidebar

Quick Tool Palette (QTP)
The Quick Tool Palette (also referred to as the QTP) provides quick access to useful tools, and acts as a right-click context menu for editing commands such as cut, copy, paste, and delete. The QTP can be moved around by clicking or pressing the centre button and dragging it to the desired location.

Click or tap the centre button to toggle between a minimized and maximised state.
To show the QTP at any location, right-click on any OKTOPUS object or directly on the slide background, if one has been applied. On a touchscreen device, a right-click command is normally initiated by pressing and holding.
The QTP will stay on the screen permanently in a minimized state unless it is dragged to the trash can. To show it again, choose Quick Tool Palette from the Settings menu.
Customizing the Quick Tool Palette
The QTP can be customized by dragging favourite, frequently used, or otherwise useful tools onto it.
- In the Tools section of the sidebar, tap and hold the tool for at least 1 second.
- Drag it near or onto the Quick Tool Palette. A “+” icon will appear.
- Release the tool, and it will now attach itself to the QTP
(Some touch screen technologies appear to be incompatible with this action due to the way they handle long taps. In this case please use a mouse).

To remove a tool that was previously added to the Quick Tool Palette, press or click on the tool, and drag it to the Trash Can at the bottom right of the screen.

Resize Tab and Aerial View

The toolbar can be minimized by clicking or tapping the left arrows / minimise button. It will become greyed-out when the toolbar is in the minimized mode.

The toolbar can also be maximized by clicking the right arrows / maximise button. This will initialise Aerial View.
Aerial View gives the full range of tools available for selection at a glance.
Click or tap a tool to open it.
You can disable an entire toolset by clicking on the toolset title. Any toolsets which have been disabled will not show in the toolset list when the sidebar is in normal mode. This may be useful if you do not have any need for specific sets of tools.

Tool Selection
When OKTOPUS is opened using the Desktop or Start Menu, the Sidebar will show the Standard Tools toolset by default, ready for annotation and lesson creation.
To change toolsets, click the current toolset title at the bottom of the Sidebar, and select from the list that appears.
You can disable / enable toolsets by clicking the toolset title when in Aerial Mode (see Resize Tab and Aerial View).

To start using a tool, tap or click it once to activate.
Some tools are available in multiple locations if they are relevant to more than one subject area. For example, the Measurement Tools found under the Math toolset are also located under the Science toolset. In addition, the Cursor Tool and Pen Tool from the Standard Tools are available all the top of the list for all subject toolsets.
Hint: Consider adding frequently used tools to the Quick Tool Palette if toolsets are switched between often for specific tools.
Slide Management
The Slide Management area will automatically show when opening a saved OKTOPUS file.
It will show the name and thumbnails of the current lesson. To change the name of the lesson, select the current name, and edit as required. To load a slide directly, click on the corresponding thumbnail.
Slides can be re-ordered by dragging a thumbnail to the new required location. A glowing outline indicates that the slide is selected for moving. A bar will appear to indicate where the slide will be inserted when released.
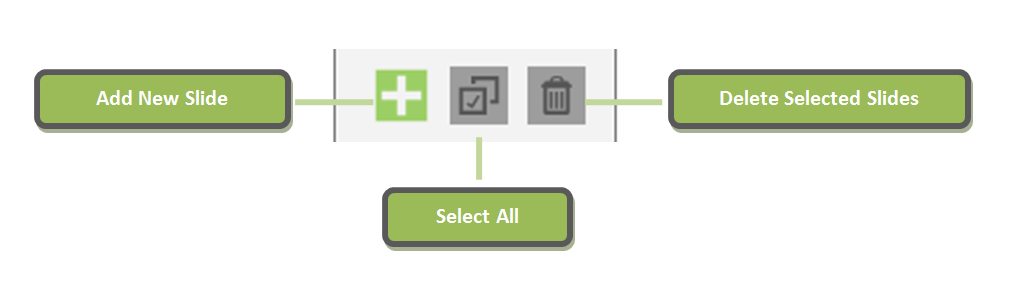
Additional tools to manipulate slides are located at the bottom of the Slide Management area:
The ability to navigate backwards and forwards through slides is available at the very bottom of the Sidebar. Select < to navigate backwards, and > to navigate forwards.

Once the final slide has been reached, the icon will change to a “+” icon, to add a new slide.

Backgrounds

To select a new background, select the Backgrounds tab, and choose a background from the list. The selected background will appear over the Desktop and any open applications.
The selected background will be automatically applied for all new slides, until another background is chosen.
Backgrounds of existing slides can be changed at any point. Navigate to the required slide, and select a new background.
There are plenty of backgrounds to choose from, including:
– Various lined backgrounds for teaching letter formation
– Various grid backgrounds for mathematical and scientific usage
– Clear whiteboard / chalkboard effect
– Colorful backgrounds including autism-friendly variants
File Options

Creating a new lesson
When OKTOPUS opens, a new lesson file is automatically created. To create a new lesson at any point, select ‘File’, and choose ‘New’ from the dropdown.

A prompt will appear on-screen asking for the entry of a lesson name. Type a name for the lesson and select ‘OK’. The name can be changed later from the Slide Management tab.
Lesson Saving, Loading, and Printing
- ‘Open’ will open an existing lesson. A file explorer window will appear to find and select the required lesson. OKTOPUS can open .wtzx file and can import *.iwb, and *.notebook files.
- ‘Open Recent’ shows the last 10 opened files and their location.
- ‘Save’ will prompt for a save location and name the first time it is used for a new lesson. It will over-write existing lessons without prompting.
- ‘Save As…’ will always prompt for a save location and name
- ‘Save As PDF’ will prompt for a save location and name, and will export the entire lesson to a PDF document.
- ‘Print’ will send the lesson slides to a printer.
Importing .notebook and .iwb files
OKTOPUS can import native .notebook files from Smart Notebook and .iwb files from Promethean ActiveInspire and Smart Notebook. IWB files from other applications may also work but are not currently supported.
The following objects are supported:
- Annotations
- Text
- Shapes
- Lines
- Images
Please contact us at our support center if you are having problems when importing and attach the file for testing.
Glass Mode
Glass Mode is a special instance of OKTOPUS with a transparent overlay.
To enter Glass Mode, select the Backgrounds tab and select the first background in the list.
Glass Mode enables annotation and the use of other tools over the current display, whether it’s an application, a web browser, or simply the Desktop. The Glass Mode layer also supports click-through, so there is no need to minimize Oktopus to work with other programs.
Navigating to a new slide will take a screenshot of everything on the screen at that moment in time for future review. When a screenshot has been taken, the word “screenshot” with an “x” will appear at the top middle of the screen.
To delete the screenshot, tap the “x”. Please note that once you delete a screenshot, you cannot get it back again.
Please Note: Glass Mode is not compatible with “Tablet Mode” in Windows 10.

Simple Glass Mode
Simple Glass Mode enables the capture of a full screen or of a section of the screen, and automatically imports it into the OKTOPUS lesson. It differs from regular Glass Mode as it minimizes OKTOPUS and shows a capture tool only, in order to capture a still image, whereas regular Glass Mode gives OKTOPUS a live transparent overlay.
If you have a 4K/UHD screen but find that the regular Glass Mode background causes poor pen performance due to underpowered or integrated graphics on your system, Simple Glass Mode is a great alternative as it can capture a static image, ready for annotation without causing pen lag.
Click the Simple Glass Mode option under Standard Tools > Capture Tools ![]()
Once you click Simple Glass Mode, OKTOPUS will minimize and you will see two capture icons:

- The left icon will capture the entire screen and set it as your background for the current slide.
- The right icon will allow you to drag to select an area of the screen. The area you selected will be imported as an image object into the current slide.
When you navigate to a new slide, OKTOPUS will revert back to the default white screen or to your last-used background, depending on whether you have set “Remember Last Used Background” to yes or no under Settings > Preferences.
Preferences
Configure various aspects of how OKTOPUS looks and works in the Preferences menu. To show the Preferences, click “Settings” and then click “Preferences”.

Appearance
Theme
Choose between a light or dark theme.
Icon Colours
Choose between monochrome or colourful icons throughout the software.
Toolbar Location
Choose whether the toolbar, also knows as the sidebar, should be on the left or right of the screen.
Hide Cursor
This will hide the cursor while OKTOPUS is the active application. It will prevent the mouse cursor and other drawing cursors from being shown. We do not recommend choosing “No” unless using a touch screen.
Remember Last Background
OKTOPUS will remember the last-used background when closed and re-opened. Please note that some license keys supplied by OEM partners may not show this setting.
Number / Letter Size
Select your default size for the “Numbers” tool in the Math toolset and the “Word & Sentence Builder” tool in the Language Arts / Literacy toolset.
Functionality
Auto-Hide Toolbar
Choose a value in seconds. If a value is selected, the toolbar/sidebar will automatically retract to a minimized form once a tool has been selected.
Touch-Friendly
If a touchscreen is detected by the software, the default should be “Yes”. Touch-friendly mode will show larger handles around images and other selected items.
Touch to Type
Touch to Type is a feature useful for lesson creation when using a mouse and keyboard. When “Yes” is selected, click on the canvas where you want to type, then start typing. The text will appear immediately starting at that location without having to create a text box.
Clear Screen Prompt
Select “Yes” if you wish to be prompted before the screen is cleared, otherwise select “No”.
Significant Figures for Sums
Select how many significant figures you would like the OKTOPUS sums to display. Sums area created using the “Numbers” and “Symbols” tools found in the Math toolset.
Simple Presentation Settings
When starting a collaboration / polling session, there are two presentation setup windows that can appear. The simple presentation setup is the default and recommended for first time users. Experienced users looking for more advanced options, or existing Qwizdom hardware users may wish to set this to “no”.
Keyboard Shortcuts
Keyboard shortcuts will work when OKTOPUS is the active application.
Tools
CTRL + 0 – Switches between Cursor and Pen Tool
CTRL + 1 – Switches between Eraser and Pen Tool
CTRL + 2 – Clear Screen
CTRL + 3 – Black Pen
CTRL + 4 – Red Pen
CTRL + 5 – Brown Pen
CTRL + 6 – Green Pen
CTRL + 7 – Purple Pen
CTRL + 8 – Blue Pen
CTRL + A – Selection Tool
CTRL + H – Highlighter
CTRL + I – Image Gallery
CTRL + K – Keyboard
CTRL + L – Line Tool
CTRL + T – Text Tool
Commands
F12 – Switch Monitor
CTRL + S – Save
CTRL + C – Copy
CTRL + V – Paste
CTRL + X – Cut
CTRL + Y – Redo
CTRL + Z – Undo
Navigation
CTRL + Tab – Toggle Sidebar View
CTRL + , (comma) – Previous Slide
CTRL + . (period) – Next Slide
CTRL + F – First Slide
CTRL + G – Last Slide
CTRL + M – Insert New Slide
Standard Tools
Standard Tools: Video Overview
Cursor
Select the cursor tool to enable a standard mouse pointer. In this mode, the cursor can select and manipulate items on-screen.
The cursor tool is available at the top of every toolset.
Selection Tool
If a background has been applied, activating the selection tool is not necessary to select items. Clicking / tapping and dragging the cursor tool will automatically draw a selection box around any items in its path.
If Glass Mode is active, the cursor tool will interact with the desktop, therefore it is necessary to enable the selection tool to select multiple items.
Below: Two individual objects have been selected by using the selection tool, which enables them to be moved or resized as one object.

Pen Tool
The pen tool can be used to annotate over OKTOPUS objects, backgrounds, and, when Glass Mode is active, even desktop applications.
The pen’s thickness, alpha, and colour can be adjusted before and after annotating. Prior to annotating, use the Pen Tool’s properties box to adjust:

After annotating, select the object, and the properties box will reappear with additional options:
- Bring to Front
- Send to Back
- Mirror Horizontally
- Mirror Vertically
- Lock in place

Below: Annotating over an image from the OKTOPUS gallery.

Handwriting Recognition
See “Pen Tool”. Use the pen tool normally to write the desired word or sentence. When finished, tap or click the “enter” icon and it will convert into text.
Windows 7 Users
OKTOPUS uses the Microsoft in-built handwriting recognition facility and therefore will convert into the language configured within your Windows Operating System.
For Windows 7 and above, refer to the Microsoft website for more information.
Windows 8 and 10 Users
To turn on handwriting recognition:
1. Click Start > Type “Language” > Click “Edit Language and Keyboard Options”
2. Click “Options” beside your system language.
3. Windows may inform you that a language pack is available to download. If so, download and install it. If not, then handwriting recognition is either already enabled, or not available for your language.
4. Restart OKTOPUS, and handwriting recognition should now work.
Lines
There are three different types of line that can be drawn – dashed, arrow head, or solid. Select the line tool, and choose the type of line required. The tool will remember which line was previously used, and will enable it by default.

For each line type, thickness, alpha, and colour can be customized.
In addition, the dashed line supports custom dash length and dash spacing.
Once a line type has been selected, it will be highlighted to indicate it is active. Click or press and drag to draw the line.
After drawing a line and selecting it the properties box will reappear with additional options:
- Bring to Front
- Send to Back
- Mirror Horizontally
- Mirror Vertically
- Lock in place
Eraser
Use the eraser tool to delete screen objects including pen and highlighter annotations, lines, and shapes. The eraser can be resized using the properties box.

Text Box
Creating Textboxes
When the text tool icon is clicked in the sidebar or the Quick Tool Palette, the cursor will change to a crosshair. This indicates that a text box is ready to be created.
Click or tap once for a text box to be automatically created with a default width and height, or hold and drag to create a custom width and height. The words “Start Typing…” will be generated.
Start typing and the highlighted default content will disappear and will be replaced with your content.
The dashed lines indicate that the textbox is in edit mode.

Textboxes will also be generated for you automatically if you copy and paste text directly into OKTOPUS from another application.
Copy text from another document or website, and when inside OKTOPUS, you can then right-click to show the Quick Tool Palette and use the “Paste” icon or use keyboard shortcuts to paste.
Modifying Textbox Width and Height
Click or tap anywhere on the screen to bring the textbox out of edit mode.
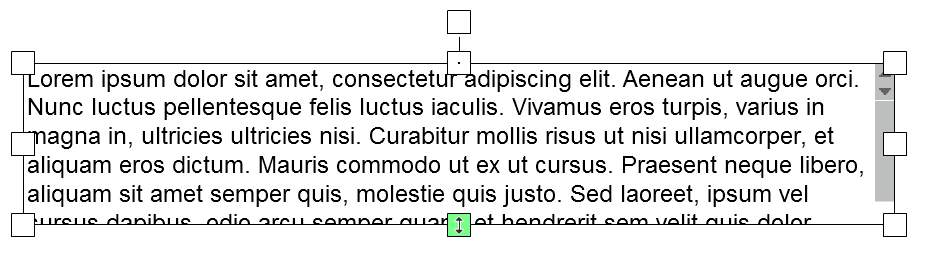
When the textbox is not in edit mode, the width and height of the box can be adjusted by dragging the handles in the direction you wish. A scrollbar will appear if the text does not fit. This may be useful if you need to place a lot of text in a small area. The scrollbar becomes active after clicking away from the textbox and the drag handles are no longer showing.
Editing Textbox Content
To enter text editing mode double click / tap the textbox.
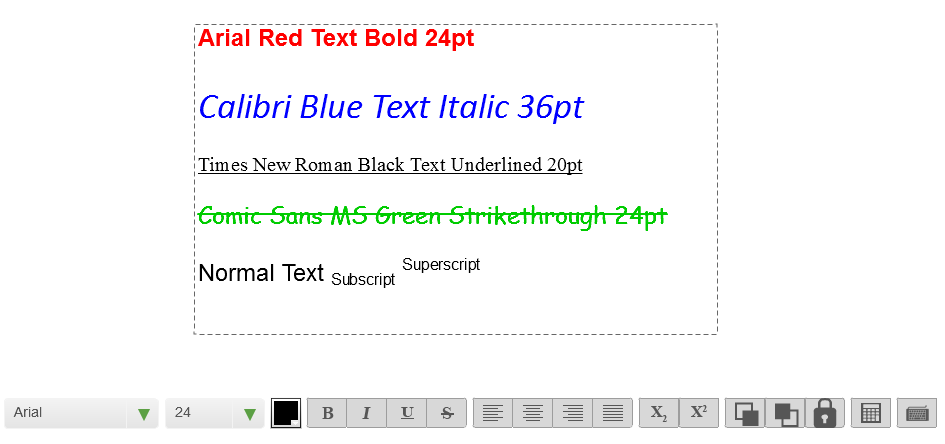
Text font, color, and size can be customized. The text box controls will appear at the bottom of the screen, supporting different fonts and font sizes, bold, italics, underlining, strikethrough, superscript, subscript, text align, and locking.
Highlight the text you want to format, and then choose the formatting you want to apply from the text controls.
To exit text edit mode, click or tap away from the text box.
To move the location of the text box, click or tap and drag to the new location. To enter editing mode again, double click / tap.
Text Table
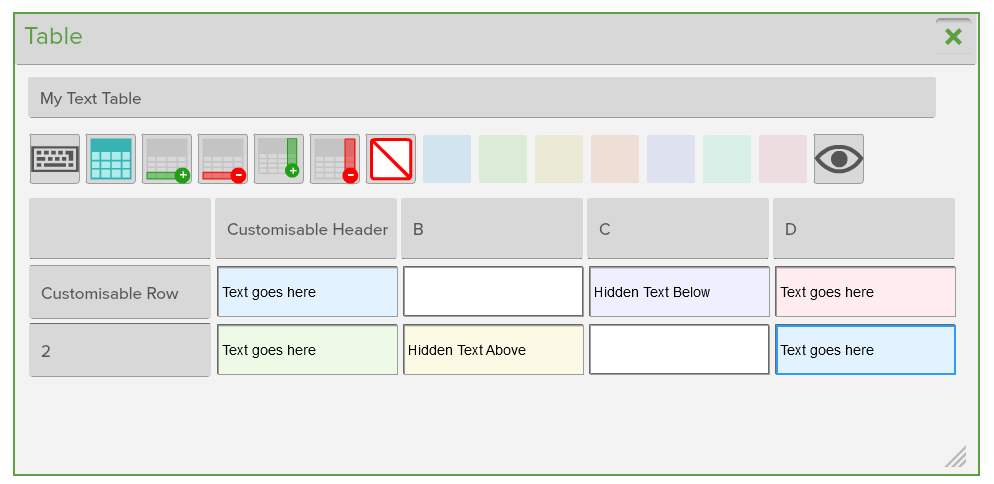
The textbox controls also includes a “Text Table” tool. This is similar to the maths table tool, but the text table tool allows you to hide/reveal text and does not generate graphs.
Easily add and remove rows, type in header / row labels, specify cell color, and hide or reveal cell contents.
Shapes
There are three different shapes to choose from – circles, quadrilaterals, and triangles. In addition, it is possible to draw a free shape, or use shape recognition.
Select the shapes tool, and choose the type of shape required. The tool will then remember which shape was previously used, and will enable it by default.

Thickness, alpha, and colour can be customised.
Once a line type has been selected, the cursor will show as a crosshair. Click /press and drag to draw the shape.
Below: Using shape recognition, a triangle is drawn.

Highlighter
The highlighter tool can be used to annotate over OKTOPUS objects, backgrounds, and, when Glass Mode is active, even desktop applications. Thickness and color can be adjusted using the menu bar along the bottom when the highlighter tool is active.

Below: Highlighting text over a web browser.

Image Gallery
OKTOPUS comes with a built-in image gallery relating to various topic areas. To bring an image into the lesson, click or tap it. The image can be resized, and rotated.
Hint: For more options such as cut, copy, paste, and bring forward / send backward, right-click on the image to show the Quick Tool Palette.

Importing Images
To import existing media, click the import icon at the bottom left of the gallery.
JPG, PNG, BMP, FLV, SWF, QWV and MP4 media formats are supported.
In addition, images can be imported from an Internet Explorer, Chrome, or Firefox web browser. Enter Glass Mode, and drag the image over the OKTOPUS sidebar. A thumbnail of the image will appears with a plus icon. Release the image and it will appear as an OKTOPUS object. Note: The image type must be one of the supported file types.
Adding Hyperlinks to Images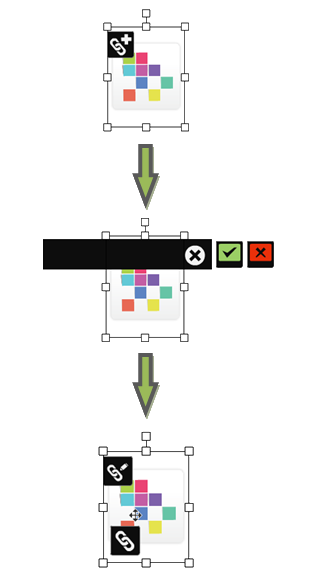
- Select the image to show to hyperlink icon.
- Click the hyperlink icon and the hyperlink area will appear.
- Type in the required web address, and tap the green tick icon to confirm.
The hyperlink has now been added. A new hyperlink icon will appear at the bottom left of the image. After selecting the image to show the hyperlink icons, click or tap this icon to launch the link in the default web browser.
Editing Hyperlinks
Use the hyperlink icon at the top left of the image to edit the link. Click the green tick to confirm the change.

The x in the white background will clear the text.
The x in the red background will remove the hyperlink.
Window Shade
The window shade is an adjustable “blind” to hide on-screen items. Multiple window shades can be used to hide multiple parts of the screen.
To adjust the shade, click or tap and drag the arrows on each side.
The colour of the shade can be adjusted using the colour palette.
To close, click or tap the X.

Flashlight
Enabling the flashlight will shroud the screen and will show a small visible area of the screen, similar to a flashlight being operated in a darkened room.
Click or tap and drag the flashlight to move it around the screen. Adjust the size of the flashlight area by dragging the resize button, and tap the X to close it.

Magnifying Glass
The magnifying glass will magnify anything that appears on screen.
Click or press and drag the magnifying glass to move it around the screen. Adjust the size of the magnified area by dragging the resize button, and tap the X to close it.
Undo / Redo
The Undo button will undo any annotation. This can be repeated multiple times to undo further actions.
The redo button will redo any annotation. This can be repeated multiple times to redo further actions.
On-screen Keyboard
The OKTOPUS on-screen keyboard will appear on-screen and can be used to type into an OKTOPUS textbox. In addition, when in Glass Mode, it can be used to type into any open application, such as an internet browser, office program, or other 3rd party programs.

Clear Screen

There are three clear screen options. A prompt will appear to ask if you are sure, unless you have turned off the prompt under the Preferences.
- Clear ScreenThis will clear all objects that are currently on the slide.
- Clear AnnotationsThis will only clear annotations such as pen and highlighter objects. Everything else on the screen will be left intact.
- Reset SlideFor this to become activated, you must first open an existing lesson. Once clicked, the slide will be reset to how it originally appeared when it was first opened. If you have made changes to your slide and then saved the lesson, it will reset to the last save point.
Capture Tools
Video Device
Display a live video feed from a built-in webcam, or an external source such as a visualiser or USB webcam.
Tap or click the video feed and the controls and surround will disappear for a clean display. Tap or click again and the controls will re-appear.
Functions include:
- Source input
- Rotate 90 degrees
- Image Capture
- Video Record
- Resize
- Full Screen

Screenshot Capture
Use the screenshot capture tool to save a snapshot image of the entire screen or of a specific area. After an image has been taken, it will appear inside OKTOPUS. A copy of the image will also be stored in your user directory under OKTOPUS\Capture.

Screen Record
The screen record tool will record a video of all screen interactions. Click the icon to start recording. Once recording has begun, the tool will flash red to indicate recording is in progress.
To stop recording, click the icon again. A prompt to save the video will appear.
Audio
The audio tool has two functions – importing audio and recording audio. Opening the tool will show the following option:
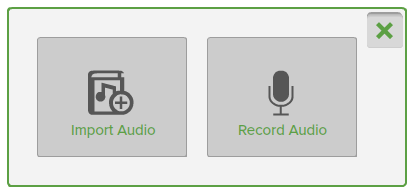
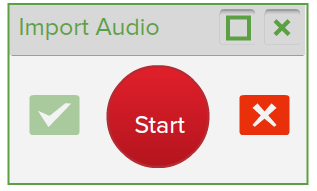
Import Audio
A prompt will appear to browse for the audio file to import. WAV and MP3 file types are supported. Once the file has been imported, click or tap the play icon to play the audio. To pause, click or tap the pause icon. Move the slider to seek.
You can also control whether the song repeats, and control the sound volume.
The audio player can be closed by clicking anywhere on the tool and then by clicking the x, or by dragging to the trash can.

Record Audio
The audio recording tool uses the primary recording device of the operating system by default. To change the recording device, change the setting in the operating system.
There are two views: full and compact. To switch between them, use the minimise / maximise button at the top right of the tool.
Full View

Minimized View
To start recording audio, click or tap the red “REC” button.
The button will change to indicate how long the audio has been recording for, and it can be taped at any time to pause, and subsequently resume recording.
To save the audio recording, click or tap the green tick. An input box will appear to prompt for the name the recording should be given. Type the name and click or tap the green tick.

The recording will now appear in the audio tool’s archive area. To load the audio, drag it onto a background, or click the add “+” icon.
Archives
The archives window will automatically add links to previously recorded videos and images.
Click on the launch button to open the media.
Note: If the media has been deleted from the system, the link will need to be manually removed from the archive.

Math - Number Tools
Numbers
Click or tap and drag numbers out from the number tool.
Join numbers together by bringing them close to each other.

Expand the number tool to see smaller and larger numbers.

Symbols
The symbols tool enables sums to be created when combined with the number tool.
- To start, drag out a number. Join numbers together if a longer starting number is required.
- Drag out a symbol and attach it to the number.
- Drag out another number and attach it to the symbol. Again, numbers can be attached together first as a separate process if longer numbers are required.
- Click or tap the ‘?’ to reveal the answer

It is possible to change the sum by replacing symbols or numbers by dragging them on top.

To delete a sum, drag it to the trash can.
Function Machine
The function machine enables sums to be made using an input/process/output method.

Set the number and symbols by using the arrows, or drag numbers and symbols into the relevant areas using the above tools. The function machine will find the missing item based on any three predefined items.
Number Grid
Generate a number grid by choosing a predefined option. Numbers can be removed from the grid, and dragged back into place.
Alternatively, select ‘Create a Grid’ and type in required values to generate a custom grid.

Number Lines
Generate a number line by choosing a predefined option. Numbers can be removed from the line and dragged back into place.
Alternatively, select “Create” and fill in the Start and End values to create a custom line with either 11 or 21 values.

Calculator
An on-screen calculator with basic functions.

Fractions
The fraction tool can be used to create sums, or to create pie charts and fraction bars.
Creating sums
- To start, drag out a fraction from the existing list or create a custom fraction.
- Drag out an operative from the symbols tool and attach it to the fraction.
- Drag out another fraction or a number, and attach it to the operative.
- Click or tap the ‘?’ to reveal the answer. The fraction will simplify until the simplest form has been reached.

Creating pie charts and fraction bars
- To start, drag out a fraction from the existing list or create a custom fraction.
- Click on the down arrow to expand the window to view fractions as a pie or fraction bar.
Drag the fraction into the pie chart or fraction bar area.

Abacus
Use four rows of beads (representing units, tens, hundreds, and thousands), to count on the abacus.

Drag the beads to the right to represent numbers.
Drop a number from the number tools to show it on the abacus.
Extract any number from the abacus by clicking the “123” icon.
Math - Measurement Tools
Ruler
Use the ruler to make on-screen measurements or as a guide for straight lines between two points. The ruler can be rotated, resized, and moved to measure distances anywhere on-screen.

Converter
The Convertor tool can convert units of weight, volume, distance, temperature, time and area from one unit of measurement to another. For example: yards to metres, Celsius to Fahrenheit, and so forth.

Click or tap on the converted measurement to drag out an interactive number.
Stopwatch
Click or tap the green button to start the timer. While the timer is active, the button will change colour to red. Click or tap the button again to pause the timer.
Tap “mode” to change from timer mode to countdown mode. Type a value to countdown from, and tap the green button to start.

Protractor
Use the protractor to measure angles. The protractor has two modes: 180 and 360 degrees. Drag the angle measurement arm to measure, then click or tap it to show the angle value.

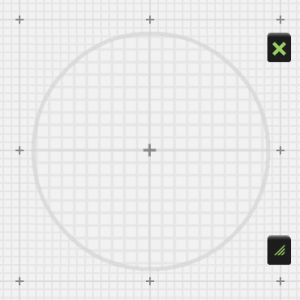
Compass
Use the compass tool to draw a circle with a specific radius and colour, then use the Circle Information screen to calculate diameter, circumference, and area.

1. Drag the pencil left or right to change the radius of the circle. Alternatively, use the arrows or type in a specific value.
2. Drag the pencil up or down to change the colour of the circle.
3. Release, and the circle will be drawn. Click the “i” to show information about the circle.
Scientific Calculator
A calculator with scientific functions.

Clock
To set the time on the analogue clock, drag the hands to the required position. As one hand is moved, the other hand will move accordingly.
To open a digital clock, click or tap the digital clock icon. It will display the same time as the analogue clock when it is first opened.

Note: The clock does not keep time. Use it as a teaching tool.
Tape Measure
Use the tape measure to measure the length of on-screen objects. Move the tape measure to the desired location, then drag the end of the tape to start measuring.
When the tape is released, the measurement will appear in the “Distance” box and will be reset when the next measurement begins.
Math - Geometry Tools
Reflection
Click or tap and drag to move the shape and the reflection. Add additional shapes to the grid by clicking or tapping the required shape at the top right. Only the co-ordinates of the selected shape will be shown.

The axis of reflection can be changed by tapping or clicking on the required button.
Note that it is not possible to enter custom values.

Rotation
Drag the point of rotation (as depicted by the grey circle) to the desired coordinates. The coordinates will be displayed at the bottom right.
Then, drag the solid shape to change the angle of rotation. The reflected shape can be adjusted by dragging the red line or adjusted by typing in a value into the “Change Angle” box.

Prisms
There are four dropdown menus available. For example, the first row depicts a triangular prism. The end shape, net, transparent 3D, and opaque 3D options can be opened and viewed.

Note: Cylinders and cones are not strictly prisms; however we have included them in this area in order to provide additional nets and 3D objects.
Pyramids
There are four dropdown menus available. For example, the first row depicts a triangular pyramid. The base shape, net, transparent 3D, and opaque 3D options can be opened and viewed.

Shapes
See “Shapes” under Standard Tools
Shapes and Angles
Create and alter shapes, then examine the angles using the Shapes and Angles tool.
Start by selecting a shape from the 6 defined presets:
The shape will appear, along with the number of angles and the angle measurements. By default, the measurements will appear as “?” and will display the correct values when taped or clicked.

Drag the points of the shape to edit them. If the angle is being shown, the value(s) will adjust automatically as the angle is being dragged.
Other tools can be used in conjunction with the Shapes and Angles tool, such as lines, annotations, and the protractor as below:

Math - Graphs and Data Tools
Tally Marks
Select the “+” button to add tally marks.
To show the number of tally marks, click or tap the “?” icon.
Below, 7 tally marks have been added.

Graphs
The graph tool can generate bar charts, pie charts, and line charts. Open multiple instances of the graph tool to utilize the multiple bar and multiple line graphs.
Input graph values:
- Enter the name of the graph and the X and Y axis.
- Type the first X-axis item into row 1, followed by the Y-axis value
- Repeat for the number of required items.
Tap the + icon to remove rows. Use Enter or TAB to confirm values.
Tap the – icon to remove rows.
Generating Graphs:
- Select the type of graph to generate from the top row
- Select “Generate Graph”
Below, left to right: Graph creation window / two bar charts showing rainfall in mm over 2012 and 2013 / combined bar chart

Probability Spinner
Use the spinner to determine the probability of selecting a colour or sequence of colours on the wheel.
To start, click or tap one of the 5 spinners (from 3, 5, 8, or 16 segments).
Spin the wheel by clicking or tapping the spin icon.
Values are hidden by default. Click the “?” to show them.

Click or tap “Add to Sequence” to add the current fraction to the sequence. An additional window will pop up and will calculate the odds of the same sequence repeating again.

Math - Games
Arithmetic
 Calculations will appear at the bottom of the game screen, and will become progressively more difficult with every question. Click or tap the numbers in the grid to fill in the missing numbers in the calculation.
Speedy Sums
Ca lculate the answer as quickly as possible to receive maximum points. Click or tap the numbers to form an answer, or use a keyboard to type it in.
Math Lines
 Aim the cannon and fire to destroy the balls by forming pairs that add up to 10.
Hint: Use one ball to destroy a group of same numbered balls.
Number Balls
 Click or tap the coloured balls in ascending order to make them pop. Work quickly in order to receive maximum points.
See-saw
U se the see-saws displayed to work out the heaviest item.
Memory
As the cards are displayed face-up, look out for the bomb(s).
When the cards turn face-down, click or tap a card to turn it over.
Don’t click on the bombs!

Sudoku
Fil l in the squares with 1 to 9 according to the following rules:
1) The numbers in each row, column, or diagonal must not be repeated.
2) The numbers in each 3×3 square (surrounded by thicker borders) must not repeat.
Make 24
 Arrange the cards and arithmetic signs into a formula that yields 24.
Ace is 1, Jack is 11, Queen is 12, and King is 13.
Language Arts / Literacy Tools
Text Box
See “Text Box” under Standard Tools
Word Vault
The word vault stores words from existing text boxes to create ‘fill in the blank’ scenarios.
To add a word, highlight it, and then click or tap the vault icon that appears above the text box.

The word will then be added to the Word Vault. The vault will open automatically after several seconds if it has not yet been opened.

Once words have been added to the vault, they can be dragged into the blank spaces in the text box. If the word is correct, it will slot into place.

In addition, it is possible to add custom words to the vault. Click the “…” to type the word, and then ‘+’ to add to the list. This function is useful for exercises where participants need to choose the correct word from a list.
Word and Sentence Builder
Create text using letters, prefixes, middle clusters, end clusters, and suffixes.

Word Parts
Type in a word and the origins of that word, its constituent parts, and meanings will be displayed.

Geography Tools
Select Map
Use the Select Map tool to drill down to Continent and Country level. Click or tap a continent and then country to zoom in.

Google Maps
Search Google Maps online to find a live map of any location. Note: There must be an active internet connection for the Google Maps tool to work.
Using the search bar, enter a location and click or tap the search icon to search Google Maps for the desired location.

Weather Symbols
Create weather maps by dragging the symbols from the weather symbol tool onto any background or object.

For example, they can be dropped on to Google Maps or other map images to show the weather in these areas, as demonstrated below:

Thermometer
T he thermometer compares temperatures in Fahrenheit and Celsius/Centigrade.
Type the temperature into either the Fahrenheit or Celsius measurement box at the bottom of the corresponding thermometer. The color bar on the right of the thermometer will indicate the temperature relative to the freezing point of water.
The ‘eye’ icon will reveal / hide the temperature.
Graphs
See “Graphs” under MathTools
Science Tools
Science Tools: Video Overview
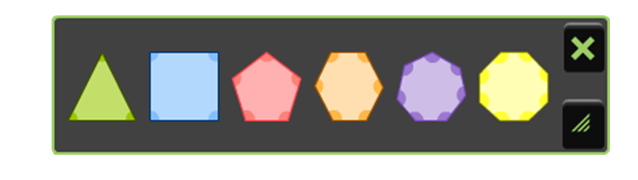
Circuit Symbols
The circuit symbols tool contains a collection of 14 symbols and illustrations to aid in examining the elements of a circuit. Symbols include:
Battery, wire, bulb, buzzer, motor, ammeter, voltmeter, resistor, variable resistor, fuse, transistor, diode, and on/off switches.
Drag out a symbol and create a diagram as required. Switch between symbols using the arrow symbol on the right hand side.

Hint: Use the text tool to add labels to the circuit, such as battery voltage or resistance. Other annotation tools may also be useful to help create more detailed circuit diagrams.
Weather Symbols
See “Weather Symbols” under Geography Tools
Thermometer
See “Thermometer” under Geography Tools
Graphs
See “Graphs” under Math Tools
Pyramid
A hierarchial pyramid can be created with up to 10 segments. It is possible to customize the name, color, and text color of each segment. The text area will expand to allow a larger amount of text to be shown.
Use the + and – buttons to add or delete segments.
Use the eye button to show / hide the segment information.
An example of use is the Waste Hierarchy, as shown:

Periodic Table
The Periodic Table is organized by atomic structure and groups, and includes information on atomic number and the number of protons in an atom’s nucleus. Click on a group along the top of the tool, and all elements in that group will become highlighted.

 Click or tap an element to reveal a visual of the atom and the outer electron shell as well as links to a wiki page.
The drop down menus provide information on reactions, compounds, state, structure, colour, melting point, boiling point, period, and group.
Molecular Structure
Using the Molecule Structure tool, create bonds between atoms and build molecules. There are four fixed-colour atoms to choose from. Select a colour to use, as shown:

To create a molecule, drag out the number of atoms required. Click inside each atom to label it. Finally, click the outer edge of an atom and drag to another. This will create a bond between them. A water molecule is shown below:

Once the atoms have been bonded, they will move as one. Click a bond to break it and move the atom independently again.
Collaboration and Polling
Collaboration: Video Overview
Note: By default, the simple presentation setup is shown when you start a collaboration session. You can select which version appears (Simple or Classic) from Settings > Preferences. Click No to display the Classic presentation setup window.
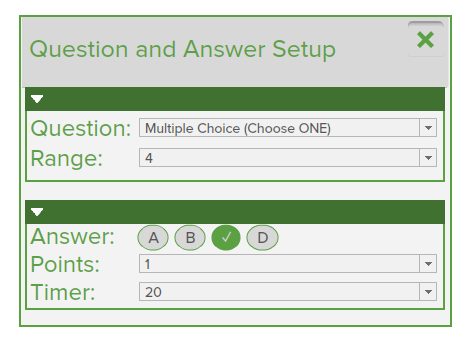
Setting up Question Slides
To set up a question slide for use in collaboration and polling, click on the “Slide View” tab at the bottom of the sidebar.
Navigate to the slide you wish to add a question to. Ideally your slide content will already be set up, but you can add it later if not.
Using your mouse, hover over the slide thumbnail and you will see a “Q” icon appear at the bottom right hand corner of the thumbnail.

Click on it, and a window will appear, prompting you to select the type of question, along with the correct answer, and points you wish to assign. (If you are on a touchscreen, as there is no hover, tap the bottom right of the slide thumbnail.)
You can click through other slides in the slide view tab without having to close and reopen the question and answser setup window each time.
Setting up Answer Slides
Answer Slides are nested slides that can only possible to create under Question Slides.
Their purpose is to explain the answer of the question they are nested under, and are shown at the presenter’s discretion – for example if they notice that the participants have scored particularly low on that particular question.
To set up an answer slide:
- First, create a question slide as previously documented.
- At the bottom left of the OKTOPUS application, beside the navigation buttons, you will now see an “+” icon. Select this to create your first answer slide.

- In the sidebar, you will now notice that you have a new slide, nested underneath your question slide.

- You can now populate this slide with any content that you would like to appear for the participants if you choose to navigate to it. For example, you might like to add the correct answer to this slide along with a prompt for discussion.
- You can add as many answer slides as you wish – keep pressing the “+” icon along the bottom. For instance, you might want to break down the explanation of how the answer was achieved or derived over several more slides.

Note: Answer Slides are not automatically navigated to, when using the main navigation buttons. Answer Slides are also not counted in the total number of slides. To navigate to an Answer Slide when in a presentation, you must click or tap the Q / A /A buttons along the bottom.
Creating a New Participant List
1. Click the Qwizdom Tools icon at the bottom right of the system tray, and select “Participants”. 
2. The Participant Wizard window will appear. Choose Create New Participant List, enter a class / file name, then click Next.

3. When the Template Selection appears, click Educational/Corporate as appropriate, then Next. Three items are required in the Selected Fields box (First Name, Last Name, and Participant ID).
4. Click Next to begin entering student information.
5. Enter First Name, Last Name, and Participant ID number. The Participant ID number can be used for student login, can be up to 15 digits. Please note that the Participant ID number needs to be numeric. It cannot include symbols or alphanumeric sequences. The Remote number will auto generate, but can be overridden. It is recommended that the Participant ID and the remote number match, to avoid any potential confusion.
6. Click Finish. The QPL (Qwizdom Participant List) file generated by the process can be imported into the Presentation Setup screen.
Starting a Presentation
From the Settings menu, select “Start Presentation”.
After a few moments, the presentation setup dialogue window will appear.
From within this window, set up the presentation options as desired.
The Presentation Setup Screen

Respond With – Choose from Touchscreen (for Front of Class games), Tablets & Laptops (for local area network collaboration), or Hardware Remotes for Qwizdom response hardware.
Participant List – Ability to select a participant list to use or run an anonymous presentation.
Save Results – Choose a location to save the question results.
Game Type – Choose a game mode or chart only
Allow participants to change answer – Allows participants to change their answer for the current question slide.
Send Right/Wrong Feedback to Remotes after answering – Users will receive a check mark if answer is correct and an X if answer is incorrect. A check mark and X will appear if feedback is turned off, to indicate that the response has been received.
Advanced – Set up custom collaboration ports if the default ports 8080 and 8081 are already in use on your network.
Front of Class Games
The OKTOPUS front of class games allows up to 4 players using a multitouch device such as a flatpanel display. Any existing Qwizdom content file that has been set up with questions slides, or any OKTOPUS lesson that has been manually set up with questions slides can be turned into a game.
- Press Settings > Start Presentation
- Select “Respond With: Touchscreen (1-4 Players)
- Choose a Game Type, eg FastTrack
- Select whether you would like to send right/wrong feedback after answering. This will show the participant whether they got the answer correct or incorrect, until the last person has responded – so use with caution as this may enable others to see the correct answer!
- Select whether you would like players to be able to change their answer, up until the moment the last person has responded.
- Click Start, and the activity will begin after a short animation plays.
- You will now be selected how many players should join (1 to 4).

- After navigating to a question slide, the answer choices will pop up in a section of the screen along the bottom. Below is an example of what participants would see after feedback has been turned on:

After all participants have answered, the games window will automatically appear. Below is an example of the scores window in FastTrack;

The presenter (or one of the participants) can select “Next” to advance to the next question, check the scores, or view the racetrack.
At the end of the presentation, the final scores are shown.
The Feedback Indicator
The feedback indicator will appear if “Laptops & Tablets” or “Hardware Remotes” has been selected from the Presentation Setup screen. It will not appear for front of class games.
Its purpose is to give a quick-glance view at the number or percentage of respondants, as well as quick access to reposing, random pick, viewing the chart, game controls, and collaboration controls.

- Response Feedback
The percentage of participants who have responded. Click to change to a numeric value. - Repose Question
Click this to repose the question to the participants. - Pick a Participant
A random participant number appears on-screen. Names will appear if a participant list is active. - Show Graph
A graph of the results will appear on-screen. - Enable Collaboration
Choose which participants are able to collaborate and send annotations to the presenter and other participants. - Show Web Address
When connecting a device through a web browser, such as a Chromebook, for a collaborative/polling session, click this link to enlarge the session’s web address.
For additional options, right-click on the feedback indicator to see options such as presentation settings, view, and transparency.
The toolbar can be dragged to any preferred on-screen location.
Enabling Collaboration
The presenter has complete control over which participants have the ability to send their annotations back to the presenter – which in turn sends it to all other participants. Click or tap the “Collaboration” icon on the feedback response indicator.

A new window will appear where individual participants can be selected or de-selected. Alternatively, choose the option to select or deselect all participants.
If a participant list is being used, the participants’ names will be shown, otherwise their device ID will be displayed.

After selecting the participant(s) to grant collaborative ability to, they will see a “share” icon at the top of their Qwizdom Notes+ screen. After annotating or adding text or other objects, tapping this icon will send their annotations and other objects to the presenter, which in turn will share with other participants.
Instant Polling
You can use the polling button to ask instant / on-the-fly questions. These are ideal when asking verbal questions, or when displaying questions from other software in Glass Mode, as OKTOPUS will take a screenshot of anything on-screen for reporting purposes.
The question types available in the Vote Tools are:
- Multiple Choice (2 to 6 choices)
- Yes / No
- True / False
- Numeric
- Sequence (up to 8)
- Rating Scales
- Text Input
- Vote (2 to 6 choices)
To begin polling, click or tap the icon relating to the question type you wish to ask. Some question types have options to choose from. For example, after choosing “Multiple Choice”, select how many choices should appear on the student’s device.
Students – Joining a Presentation
Oktopus, in conjunction with the free Qwizdom Notes+ App, allows users to join live presentations and collaborate in real-time. This all-in-one solution enables screen mirroring, presentation capture, and polling. Users can add media, share annotations, take notes, answer questions, and review content post session.
In addition, Notes+ can be used as a scratch pad or note taking application. Quickly organize thoughts and illustrate concepts using media capture, shape, text, and drawing tools.
The Qwizdom Notes+ App is available from the Google Play Store, Apple App Store, and Windows Store.
![]()
![]()
Notes +Features:
- Drawing, Text, & Shape Tools
- Note Taking
- Polling Tools
- Lesson Saving
- Annotation Sharing
- Local Network Communication
- Available in 40+ Languages
Once opened, the Notes+ app will look similar to the following image. Inthis mode, Notes+ can be used as a scratch pad or note taking application.

The area on the right hand side contains tabs for making notes, viewing slides, and answering questions posed by the presenter.
Joining a presentation:
Using the Notes+ app:
- Open the Notes+ app on the device
- Press Fileand then press Find Session
- A list of available sessions will appear.
- Tap the session you wish to join.
Note: If the session does not appear, network discovery may not be available. In this scenario, press File > Join Session. Enter the IP address supplied to you by the presenter. The port number should be left as 8081 when using the Notes+ app.
Using a web browser:
- Open a web browser
- Enter the IP address supplied by the presenter, followed by port 8080. For example, if the presenter’s IP address was 192.168.1.10, in the URL bar, you would type http://192.168.1.10:8080
- Press the return/enter key or click the “Go” button beside the URL bar.
Note: The browser version does not contain the same feature set as the app, such as saving and adding notes.
The app or browser will now attempt to connect to the presenter’s live session. If the presentation was live before the app connects and the presenter has already annotated or navigated through slides, all previous actions are sent to the app to ensure that the participant receives the entire presentation thus far.
Students – Saving a Lesson
Once the presenter or teacher has stopped the presentation, the slides will appear on the right hand side. At this point, the presentation – including any annotations and other objects – can be saved on the device for future review.
Please note: This feature is not available when connecting to a session via a web browser
1. Tap File
2. Tap Save
3. Type in a file name and tap OK.
Viewing Results
GameZones
GameZones
Please note: GameZones requires a touch screen to interact with the games and is only available for Microsoft Windows .
Choose from over 90 interactive teaching games designed for touch screens. Set up a single game for a small group or create up to four separate zones where students can play a game of their choice.
To open GameZones:
- Double click on the Desktop Icon
- Or in OKTOPUS, click on the GameZones Icon.
(To open the launcher, click on the Home Icon (Top-Right).
Select a Layout.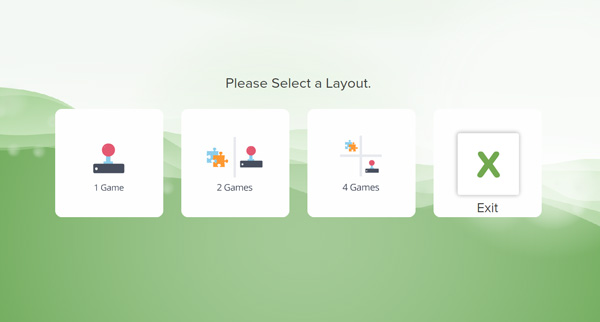
1 Game: View 1 Game at Full Screen
2 Games: Splits the Screen into two sections.
4 Games: Splits the screen into four sections.
Each zone can be rotated, making the application suitable for use on a vertical or horizontal flatpanel screen.
Select a Subject. Teaching Tools are designed for front of class instruction.
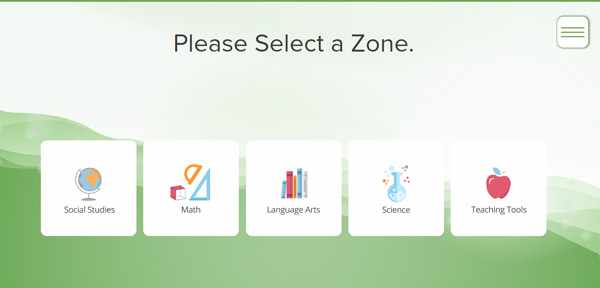
Navigate to a game and select a tile to begin.
Tap the ‘Menu’ button (top right) to select a New Game, Rotate Canvas, or Quit (Remove Player).

To Exit Game Zones : Tap on the Menu (bottom center) and select Exit > Continue.

Oktopus Blend
Search & Download Content
[CBC show=”n” country=”gb”]
- Click on the
 Settings menu and select Log in to My Account. If you do not already have an account you will need to register for an account. To register, click on Not Registered? and complete the online registration form. If you have a Blend or Premium Lessons license key, be sure to enter it when you register.
 - Enter your username (email address) and password. Check Save Credentials.
- Go to the Lessons menu and select
 Search.
 - Type a keyword into the search field. If you would like to refine your search, click on Advanced Search, select Grade, Subject and then click Go.
- There are 2 types of content: Free Content (available to anyone with an Oktopus license in the US) and Premium Content (which requires a Blend or Premium Lessons annual subscription).Free Content Sample:
 Premium Lessons Sample:

- Click Preview to quickly view all instruction and question slides. Answer slides are not available for preview.
- Click Download and the activity will be downloaded to your computer.
- Go to the File menu, select Open, browse to the newly downloaded activity (.qap) and then click Open.

[/CBC]